How to boot into safe mode
November 28, 2024
Safe Mode is a troubleshooting option in Windows that starts your computer with a minimal set of essential files and drivers. This restricted mode helps to isolate and resolve issues caused by unnecessary software or hardware. It is particularly useful if your computer is infected with malware or if a recent installation of software or hardware is causing problems. Safe Mode facilitates effective troubleshooting and the removal of problematic software or drivers.
Booting into safe mode using System Configuration (msconfig.exe)
Msconfig, also known as the System Configuration tool, is a Windows utility designed to help manage and troubleshoot your computer's startup processes. It provides access to various settings that allow you to effectively diagnose and resolve performance and stability issues.
To open the System Configuration, click on the search bar in the Windows taskbar, type “msconfig,” and select System Configuration from the search results.

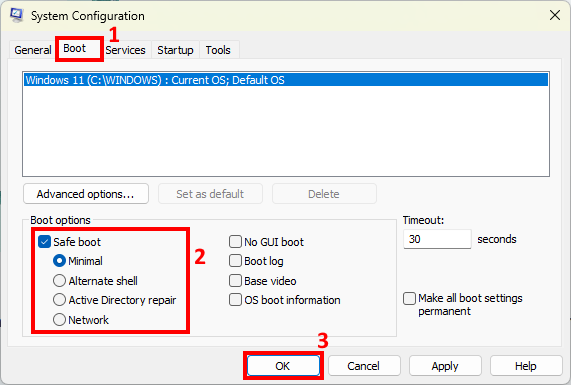
In the System Configuration, navigate to the "Boot" tab. Check the box labeled "Safe Mode." If you require networking capabilities for troubleshooting, select the "Network" option instead of the "Minimal" option under the Safe Boot checkbox.

After clicking "OK," a dialog will appear, allowing you to restart your PC immediately. If you choose "Exit without restart," your computer will still boot into Safe Mode the next time you restart it.

When you restart your computer, Windows 11 will start in Safe Mode, allowing you to log in and begin troubleshooting.

Booting into safe mode when you can’t sign in to Windows 11
Windows 11 will automatically enter Automatic Repair mode if it fails to start normally for two consecutive attempts. To trigger this mode, simply interrupt the normal boot process twice in a row.
When the Windows logo appears, press the reset button, and do the same during the second boot. The third boot will activate the Automatic Repair mode.

Wait for Windows preparing the Automatic Repair.

Then, wait for the Diagnosing process to finish.

Next, the Automatic Repair screen will appear. Click the Advanced options button.

On the "Choose an option" screen, click on Troubleshoot.

On the Troubleshoot screen, click on Advanced options.

In the Advanced options screen, click on Startup Settings.

Windows 11 then loads another screen called Startup Settings. It informs you that after restarting your PC, you can change Windows options. One of them is that you can Enable Safe Mode. Click or tap on the Restart button.

After Windows 11 restarts, you'll see the Startup Settings screen with several options. To enter Safe Mode, choose one of the following:
- Standard Safe Mode: Press 4 or F4 to start Windows 11 with a minimal set of drivers and services.
- Safe Mode with Networking: Press 5 or F5 to include network drivers and services along with Safe Mode.
- Safe Mode with Command Prompt: Press 6 or F6 to start Safe Mode and automatically open the Command Prompt.
Each option serves a different purpose and can help with various troubleshooting scenarios.

Windows 11 will then start in Safe Mode, allowing you to log in and begin troubleshooting.

Latest App Updates
April 16, 2025
February 11, 2024
February 06, 2025
January 30, 2025
Windows Tips and Tricks

How to boot into safe mode when you can’t sign in to Windows 11?

How to Create a Windows 11 24H2 USB for Unsupported PCs?

How to Reinstall Windows 11 Without Losing Personal Data?

How to Join Windows Insider Program?

How to Install Python on Windows 11?
More Tips and Tricks >>>


